Thursday, 22 September 2016

AX 7. Override form data source field methods without overlaying.

It is a common customization task to override standard form data source field methods like jumpRef(), modified() or  validate().
Recommended approach in AX 7 is to avoid overlaying and use extensions as much as possible. To achieve this new events were introduced. However on form data source field level we have only 3 available events:
SalesTable
We can try to use form controls instead of form data source fields but this approach has several cons:
  • User can add new control using form personalization and this control won’t support overridden logic. It could be critical if you are restricting field lookup values or adding validations.
  • One form could have several controls that refers to one data source field so you have to duplicate your code.
  • Number of delegates are limited as well. Microsoft will add more later🙂
For example we want to add custom jumpRef() and validate() methods to itemId field on sales order form. To achieve this we have to either overlay it or use next approach.
First of all we will create class to handle method overrides.

public class SalesTableEventHandler
{
    /
    [FormDataSourceEventHandler(formDataSourceStr(SalesTable, SalesLine), FormDataSourceEventType::Initialized)]
    public static void SalesLine_OnInitialized(FormDataSource _sender, FormDataSourceEventArgs _e)
    {
        var overrides = SalesTableFormExtensionOverrides::construct();

        _sender.object(fieldNum(SalesLine, ItemId)).registerOverrideMethod(methodStr(FormDataObject, jumpRef),
            methodStr(SalesTableFormExtensionOverrides, itemId_OnJumpRef), overrides);

        _sender.object(fieldNum(SalesLine, ItemId)).registerOverrideMethod(methodStr(FormDataObject, validate),
            methodStr(SalesTableFormExtensionOverrides, itemId_OnValidate), overrides);
    }
}

Then we will create new event handler class and subscribe to OnInitialized event of SalesLine data source.


public class SalesTableFormExtensionOverrides
{
    protected void new()
    {
    }

   
    public static SalesTableFormExtensionOverrides construct()
    {
        return new SalesTableFormExtensionOverrides();
    }

   
    public void itemId_OnJumpRef(FormDataObject _targetField)
    {
        InventTable::jumpRefItemId(_targetField.getValue(), OpenMode::Edit);
    }

   
    public boolean itemId_OnValidate(FormDataObject _targetField)
    {
        //emulate super() call. Comment out to skip.
        boolean ret = _targetField.validate();

        if (ret)
        {
            //custom validation here.
        }

        return ret;
    }
}

Monday, 22 August 2016

AX7 : DISPLAY METHOD ON TABLE EXTENSION


On AX7 we don’t have the option to create methods on table extension, so we should use the extension class to do that. The example below will show how to create a display method on the table extension class and use on a form extension.

First create your table extension class and your display method following the example below:
public static class MyCustTable_Extension
{
[SysClientCacheDataMethodAttribute(true)] // optional
public static display Name myDisplayName(CustTable _this)
{
     return _this.nameAlias() + "myDisplayName";
}

}
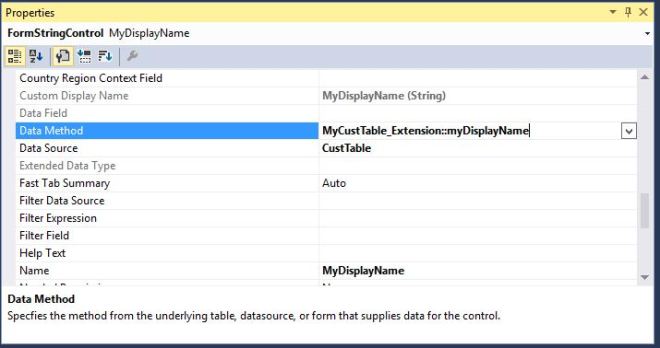
To use your display method on the form, create your new field on the form extension and use the property as below:
Capture
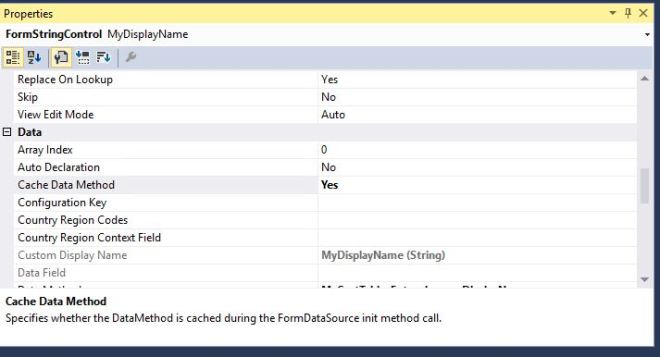
To cache your display method on the form set on the field the property “Cache Data Method” = yes if you don’t want to use the Attribute above.
Capture2

Friday, 5 August 2016

Label creation in AX 7

Label creation in AX 7 is similar to previous versions but with small changes to it.
·         In Solution Explorer, right-click on the Project.
·         Click Add.
·         Click New Item....
 

Under AX7 Artifacts, click Labels And Resources.
·         Select Label File.
·         Enter Name field.
·         Click Add.


The Label file Wizard will be displayed.
·         Fill Label file ID field - identifier prefix for new labels.
·         Click Next.


·         Selected languages - chose the language for the labels
·         Click Next.


Click Finish to create the Label File.


Right-click on the new label element in the project
Click Open.


Click New to create a label.
Label ID field, type.
Label field.
Description field.

Note: Like previous versions of AX Label Id will not be generated automatically. It will be a user specified Id.


Thursday, 4 August 2016

Form patterns in AX 7

In AX, there are 5 form patterns that we use the most :
  • Details Master
  • Form Part – Fact Boxes
  • Simple List
  • Table of Contents
  • Operational work-spaces
Sometimes, we want to follow some other patterns but we don’t know where to find. It is time consuming to look for form by form. Here is the quickest way
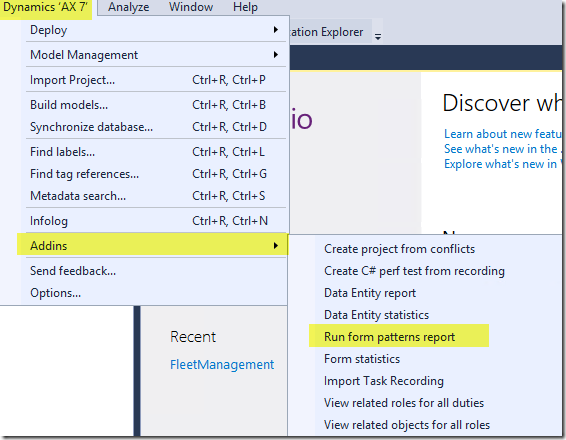
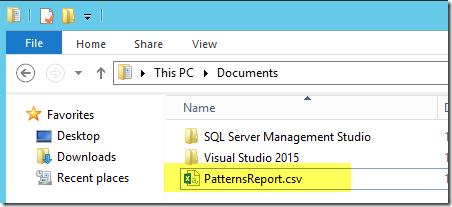
Step 1: We’re going to look at how to run the form patterns report. This report is generated through Visual Studio and gives us information about all of the forms in the system with the corresponding form patterns
clip_image001
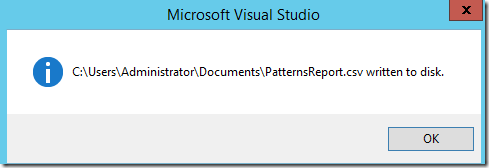
This will generate a CSV file that we can open in Excel
clip_image002
clip_image003
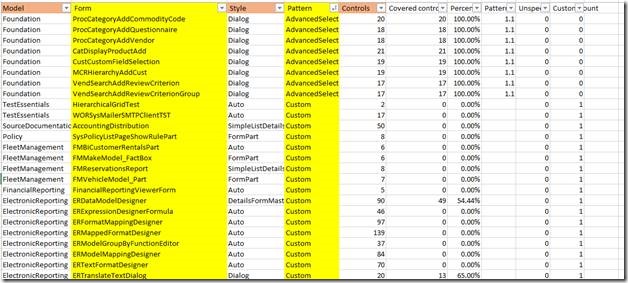
Step 2: Open the excel and we’ll notice in Excel, we have columns that tell us which model the form is in, the system name for the form, as well as the form style and the form pattern
clip_image005
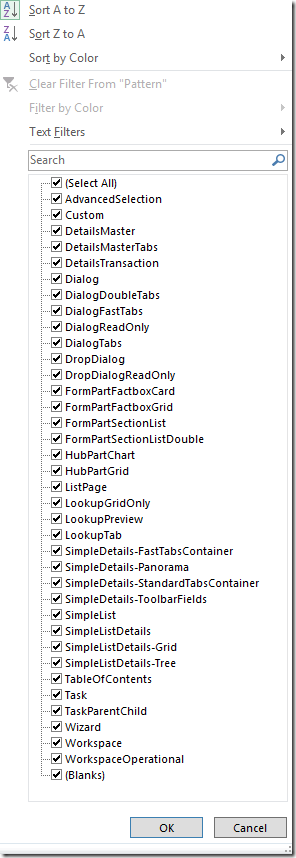
In addition, it gives us information about the controls and the percent of coverage.  So we’re free to now sort and filter and organize this list so we can determine which system form has which pattern applied, and also which forms do not have any pattern applied.  So if I want to sort on this particular pattern column, we can go ahead and apply sort.
Below are all form patterns in AX7
clip_image006

AX7 Shortcut Keys (CTP7)

The following keyboard shortcuts apply across Microsoft Dynamics AX7. 

Action shortcuts

To do this
Press
Move to the top Action Pane
CTRL + F6
Open a Tab in the Action Pane or a Menu
ENTER
SPACE
ALT + DOWN
Move to next/previous option in a Menu
DOWN / UP
Close a Tab in the Action Pane or a Menu
ESC

Filtering shortcuts

To do this
Press
Open grid filtering for the current column
CTRL + G
Close grid filtering for the current column
ESC
Open advanced filtering/sort
CTRL + SHIFT + F3

Grid shortcuts

To do this
Press
Move to the next/previous column
TAB / SHIFT + TAB
Move to the next/previous row
DOWN / UP
Move to the next/previous row without marking
CTRL + UP / CTRL + DOWN
Mark/unmark the current row
CTRL + SPACE
CTRL + CLICK
Add the next/previous row to the marked set
SHIFT + SPACE
Add a range of rows to the marked set
SHIFT + CLICK
Go to the next/previous page of data
PAGE UP / PAGE DOWN
Create a new row at the bottom of the grid
DOWN (from the last row)

Form shortcuts

To do this
Press
Move to the next/previous field
TAB / SHIFT + TAB
Move to the next/previous tab
ALT + SHIFT + RIGHT /  
ALT + SHIFT + LEFT
Move to the next/previous FastTab
ALT + SHIFT + DOWN /
ALT + SHIFT + UP
Move to the <n>th FastTab
ALT + <n>  (<n> = 1-9)
Move to the <n>th tab
ALT + SHIFT + <n> (<n> = 1-9)
Expand a FastTab (with focus on the fast tab header)
SPACE
ENTER
Collapse the current FastTab
ALT + 0
Create a new record
ALT + N
Delete a record
ALT + DEL
ALT + F9
Save record
CTRL + S
ALT + S
Revert (Restore)
CTRL + SHIFT + F5
Data refresh
SHIFT + F5
Move to the previous record (outside a grid)
CTRL + UP
Move to the next record (outside a grid)
CTRL + DOWN
Move to the first record (outside a grid)
CTRL + HOME
Move to the last record (outside a grid)
CTRL + END
Attach a document
CTRL + SHIFT + A
Export to Excel
CTRL + SHIFT + E
Open lookup, combobox, date picker, drop dialog
ALT + DOWN
Close lookup, combobox, date picker, drop dialog
ESC
Toggle Edit Mode
F2
Toggle visibility of the FactBox Pane
ALT + F2
Execute the default button on the form/dialog
ENTER
Switch to grid view
CTRL + SHIFT + G
Switch to details view
CTRL + SHIFT + D
Switch to header view
CTRL + SHIFT + H
Switch to lines view
CTRL + SHIFT + L
Close the form (click Back)
ESC
Close the form with explicit save
SHIFT + ESC
Close the form discarding any unsaved changes
CTRL + Q

Date control shortcuts

To do this
Press
Enter the session date in a date field
D + TAB
Enter the current date in a date field
T + TAB

Date Picker shortcuts

To do this
Press
Open the date picker
ALT + DOWN
Move between dates in the date picker
CTRL + arrows
Move to the next/previous month
PAGE DOWN / PAGE UP
Move to the next/previous year
CTRL + PAGE DOWN /  CTRL + PAGE UP

Segmented Entry shortcuts


To do this
Press
Open the dropdown (when the dropdown is closed)
ALT + DOWN
Move focus into the input field for the current segment in the dropdown (when the dropdown is already open)
ALT + DOWN
Close the dropdown
ALT + UP
Close/open the right portion of the dropdown
ALT + LEFT/ ALT + RIGHT
Toggles between “Show valid” and “Show all” modes
ALT + W
Select value from dropdown and move to the next segment
ENTER
Moves to the next/previous control on the page (when focus in is input control)
TAB / SHIFT + TAB
Moves to the next/previous input field in the flyout (when focus is in the dropdown)
TAB / SHIFT + TAB
Move up/down a row in the lookup
UP / DOWN
Move up/down a page in the lookup
PAGE UP / PAGE DOWN
Move to the top/bottom of the lookup
HOME / END